
VFT-SSC Invictus Install
PACKAGE CONTENTS
- Viper Force Transducer with Side Stick Controller Base
- Vertical Mounting plate
- Horizontal Mounting Plate
- Mounting Hole Jig
- 1/4"-20 flat head screws x2
- 10-24 flat head screws x3
- 10-24 round head screws x4

TOOLS REQUIRED
- Phillips head screwdriver
- Small flathead screwdriver
- Drill

Step 1: Drilling Mounting Holes
- Using the supplied mounting hole jig, align the forward edge of the jig at the meeting line with the Right Console and Right Aux Console. The jig should rest on the top of the Right Console.
- Mark the holes in the jig on your sidewall.
- Drill the holes for the VFT Vertical Mounting plate. The plate is threaded 10-24 and there are four 10-24 screws supplied. A close fit clearance hole for 10-24 is .206", which is a #5 drill bit. For our metric friends, a 5.3mm would be the closest fit. You can drill slightly larger, but be careful as too much play will prevent your stick base from mounting securely.
Step 2: Attach Mounting Plates
- Attach the horizontal mounting plate to the vertical mounting plate using the supplied screws. We recommend using thread locker to prevent the screws from loosening over time.
- Attach the VFT Stick Base to the Horizontal Mounting Plate using the supplied 1/4-20 screws. Again, we recommend using thread locker.
- Align the holes in the vertical mounting plate to the holes you drilled in the side wall. Using the supplied 10-24 screws and washers, screw the mounting plate to the side wall. Make them snug, but be careful not to damage the aluminum threads by overtightening.
Step 2: VFT Connection
- Connect the 5 pin connector from the VFT to the 5 pin connector of the Thrustmaster Cougar HOTAS PCB.
- Connect the X Axis wire to the X Axis connector on the Cougar HOTAS PCB. The X Axis connector is labeled, but just in case it is hard for you to see, it is on the same side as the 5 pin connector.
- Connect the Y Axis wire to the Y Axis connector on the Cougar HOTAS PCB.
Step 3: Manually Calibrate Your VFT
- Using the original Cougar PCB USB Cable, connect the device to your computer.
- Open the Cougar CCP on your desktop.
- Navigate to the start-up & calibration tab.
- Click the manual calibration button.
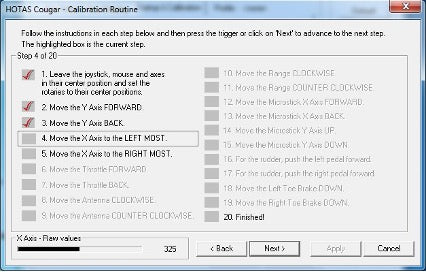
- Click next until the software directs you to move y-axis forward, and use a small flathead screwdriver inserted into the right access hole in the back of the stick base VFT to adjust until you get a raw value of 324. This may be a little difficult as you cannot see the brass knobs you need to turn. Be careful and patient. The values were adjusted before leaving the shop, so you can definitely do it. You will not need to calibrate the Y axis back value as it will carry over.
- Click next until the software directs you to move the X-axis to the left most, then do the same with the left access hole until the X-axis value reads 324. . You will not need to calibrate it to the right as the value will carry over.
- Jump back to step 1 of the calibration menu.
- Now finish the calibration following the calibration steps of the HOTAS CCP menu.
It is important to note that any changes to the environment may affect the calibration of the VFT. Changes in temperature, humidity, etc. can affect it. If you are having issues, either increase the dead zone, or recalibrate.
Curves and Dead Zones
Depending on how and where you mount your VFT, you may need to adjust the sensitivity of the stick. The sensitivity can be controlled by the curve settings in the HOTAS CCP axis shaping tab. Adjusting the curve is a matter of personal taste.
You can also set the dead zones, and they will not affect the curves. We recommend a dead zone of 10 for the center of both the X and Y axis.
Mechanical Center Play
The Thrustmaster sticks are notorious for the mounting nut to back off during use, which creates mechanical play in the stick. Tightening the screw on the bottom of the stick may resolve some of the play, but it will eventually return. The TPU deflection gasket will eliminate most of this by holding the nut in place with friction.
This horseshoe part below is another option to prevent the nut from backing out, but is omitted from the newest version of the VFT as it is no longer necessary for most users. If you have issues with the large attachment nut backing off, let us know and we will send you a part to help secure it. (Or send you a file to print it yourself if you have the capability)
